
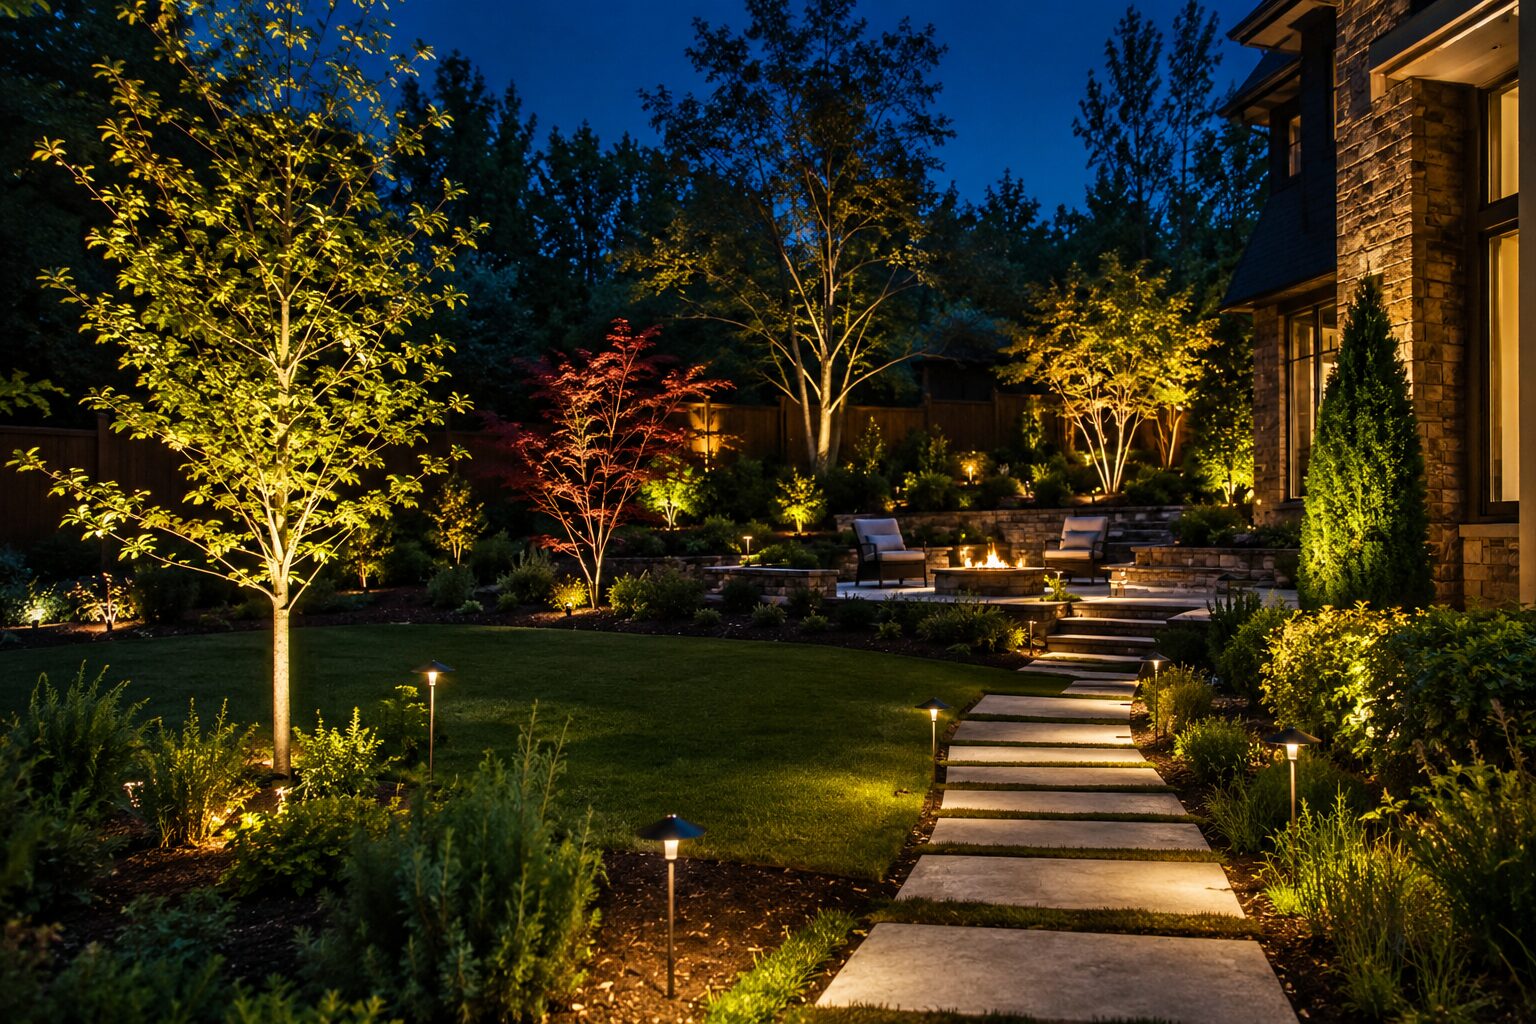
Landscape lighting in Atlanta should do more than make a dark yard brighter.
It should reveal the parts of your property that deserve attention, make outdoor areas feel comfortable, and create a view that looks intentional from the street, patio, and inside your home.
The most attractive yards are rarely the brightest ones. They use light selectively. A large tree may become a focal point, a stone wall may gain texture, and a softly illuminated path may lead visitors toward the entrance.
Meanwhile, other areas remain darker so the highlighted features stand out. Creating that kind of nighttime appearance requires more thought than placing lights at equal distances around the yard.
You need to consider how people use the property, which features give it character, and how different layers of light work together.
Begin With the View You Want to Create
Before choosing fixtures, view your yard from the street, driveway, entrance, patio, and main windows around sunset.
Identify features that disappear, areas that feel flat, and paths or steps that need better visibility.
Decide what should attract attention first and how the eye should move through the yard. This approach prevents random fixture placement and creates a coordinated landscape lighting design.
Decide Which Features Deserve Attention
Not everything in the yard needs to be illuminated. If every plant, wall, and pathway receives the same amount of light, the property loses depth.
Nothing stands out because everything competes for attention. Choose a few primary features. These may include:
- A mature oak, magnolia, or ornamental tree
- The columns or stonework around the entrance
- A textured brick or natural-stone wall
- A fountain, sculpture, or water feature
- A retaining wall with distinctive materials
- A carefully planted garden bed
- An outdoor fireplace or seating area
Once you identify the main focal points, consider what can support them.
A softly lit garden bed can lead the eye toward a brighter tree. Gentle illumination on a walkway can connect the driveway to the front entrance.
A darker area between two features can provide the visual pause that makes both more noticeable.
This is why darkness is not a design failure. Used deliberately, it creates contrast and gives illuminated features room to make an impression.
Build the Scene With Different Layers of Light
A yard can look flat when every fixture points in the same direction or sits at the same height. Layering several lighting techniques creates a more natural scene.
Give Trees and Architecture More Presence
Uplighting is often used to reveal the height and form of trees, columns, walls, and architectural details.
A fixture positioned near the base of a mature tree can highlight the trunk before the beam opens into the canopy.
The angle and beam spread should match the subject. A narrow tree or column may need a concentrated beam, while a broad oak canopy requires wider coverage or more than one carefully positioned fixture.
Not every tree needs the same treatment. Some may serve as strong focal points, while others need only a small amount of background illumination.
Varying the intensity keeps the landscape from looking staged or repetitive.
Add Soft Light From Above
Downlighting places the light source above the area being illuminated. When installed thoughtfully in a mature tree, it can cast gentle shadows through the branches and create an effect similar to moonlight.
This technique can work well over a path, planting bed, lawn, or seating area.
It adds another visual height to the design and can make the illumination feel as though it belongs in the landscape rather than coming entirely from ground-level fixtures.
The fixture must be positioned with tree health, future growth, accessibility, and glare in mind. The goal is to see the soft effect on the ground—not a bright source overhead.
Make Paths Feel Inviting, Not Mechanical
Pathway lighting should make curves, intersections, steps, and changes in elevation easier to recognize.
However, placing lights at perfectly even intervals on both sides of a walkway can create a rigid airport-runway appearance.
A more natural design responds to the path itself. Fixtures can alternate from side to side, appear near turns, or coordinate with nearby plants.
Each light should contribute useful coverage without becoming the dominant feature.
Step and hardscape lights can also be integrated into walls, risers, or nearby structures. They provide illumination closer to the walking surface without filling the area with freestanding fixtures.
Bring Out Texture in Walls and Hardscapes
Brick, stone, bark, and textured walls often become more interesting when light passes across them at an angle.
This technique, known as grazing, creates small shadows that reveal the character of the surface.
If the goal is to illuminate a broader façade more evenly, wall washing may be more suitable. Grazing emphasizes detail; washing emphasizes the overall structure.
Understanding that difference matters. Simply pointing a bright fixture toward a wall may illuminate it, but it will not necessarily produce the depth or balance you want.
Use the Right Amount of Light
One of the quickest ways to weaken a landscape design is to make every fixture too bright.
Excessive output can wash out plant texture, create hard shadows, and make the yard feel more like a parking area than a comfortable outdoor setting.
Brightness should relate to the size and importance of the feature. A large tree seen from the street may need more output than a small plant near a walkway.
A narrow beam can draw attention to a specific detail, while a wider beam produces softer coverage across a larger surface.
Nearby fixtures must also be balanced. If one tree is significantly brighter than the entrance, it may pull attention away from the home.
If pathway lights overpower the garden, people will notice the fixtures instead of the landscape.
Review the complete scene rather than judging one light at a time.
Choose a Color That Complements the Property
Color temperature influences how landscaping and building materials appear after dark.
Warm white light often complements Atlanta homes with brick, natural stone, wood, and traditional architecture.
It can also bring out the warmer tones in plants and create a relaxed atmosphere around patios and seating areas.
Slightly cooler light may work with certain modern materials or task-oriented spaces, but noticeable color changes within one view can make the design feel disconnected.
Color temperature does not have to be identical in every part of the property. However, any variation should have a reason.
The front façade, garden, walkway, and patio should still feel like parts of one coordinated nighttime environment.
Hide the Source and Control the Glare
Good landscape lighting allows you to appreciate the illuminated tree, wall, or path without staring into the fixture producing the effect.
Glare commonly occurs when a fixture is placed in a direct line of sight or aimed too high.
Check the lighting while standing on the sidewalk, sitting on the patio, walking toward the entrance, and looking through the main windows.
The design should also consider neighboring homes and nearby roads. Light that spills across a property line or enters a bedroom window does not improve the landscape.
Adjusting an angle, reducing the output, moving a fixture, or adding shielding can often correct the issue.
These decisions must be made after sunset because daytime placement cannot fully reveal glare, shadows, and beam coverage.
Plan Separate Lighting for Different Parts of the Yard
The front entrance, driveway, patio, pool, and garden do not always need to operate at the same time.
Dividing the system into zones gives you greater control over how the property looks and functions.
Entrance and pathway lighting may remain on for most of the evening. Patio lights may be needed only when the space is in use. Decorative illumination around gardens or water features may follow a shorter schedule.
Timers and photocells can respond to regular schedules or changing sunset times.
Smart controls may allow homeowners to dim lights, operate individual zones, or create settings for everyday evenings and outdoor gatherings.
The controls should be easy to understand. A complicated system that no one knows how to adjust will not provide much practical value.
Consider How Atlanta Conditions Will Change the Design
Atlanta’s rapid plant growth, pollen, rain, humidity, clay soil, and irrigation can affect landscape lighting. Plants may block beams, while debris can cover low fixtures.
Use exterior-rated fixtures, protected connections, and corrosion-resistant materials.
Place lights where water does not collect and where they remain accessible for cleaning and adjustment.
Let the Design Evolve With the Landscape
Landscape lighting needs occasional adjustment as plants grow and outdoor areas change.
Clean lenses, trim foliage blocking the light, remove debris, realign moved fixtures, and update timers seasonally.
When adding a patio or redesigning the yard, rebalance the existing system before installing more lights.
Create a Better Nighttime View of Your Atlanta Yard
A beautiful nighttime landscape is created through selection and restraint.
Begin with the way you use the property, choose a few meaningful focal points, and connect them with different layers of light.
Balance the brightness, control glare, and allow some areas to remain dark.
NightVision Outdoor Lighting develops customized plans for landscape lighting in Atlanta based on the property’s architecture, landscaping, and outdoor spaces.
Schedule a consultation to discuss what currently disappears after sunset and how thoughtful lighting could give your yard a more complete nighttime appearance.
Frequently Asked Questions
Which Areas of a Yard Should Be Illuminated First?
Begin with entrances, walkways, steps, driveways, and outdoor living areas where people move or gather. After addressing those locations, choose a few trees, gardens, walls, or architectural details as focal points. Not every part of the yard needs light.
What Color Temperature Works Well for Landscape Lighting?
Warm white light commonly complements greenery, brick, wood, stone, and traditional architecture. Cooler light may suit certain contemporary properties or activity areas. The best choice depends on the materials and atmosphere, but nearby sources should not create distracting differences in color.
How Far Apart Should Path Lights Be Placed?
There is no universal spacing because coverage depends on fixture height, brightness, beam spread, path shape, and surrounding landscaping. Place lights where they help define curves, intersections, and elevation changes instead of arranging them in perfectly even rows.
Can Landscape Lighting Be Added to an Established Yard?
Yes. A lighting plan can usually work around existing trees, gardens, irrigation, hardscapes, and outdoor living areas. The installer should evaluate roots, utilities, cable routes, drainage, and access before determining where fixtures and connections can be placed.
How Often Should Landscape Lighting Be Maintained?
Maintenance depends on plant growth, pollen, weather, irrigation, and landscape activity. Check the system periodically and after storms or major yard work. Clean lenses, remove debris, trim obstructing plants, correct fixture alignment, update schedules, and arrange repairs when the lighting changes.